ecourts.gov.in Case Status : District & Taluka Courts of India
Organization : eCourts District & Taluka Courts of India
Service Name : Case Status
Applicable For : India
Website : https://services.ecourts.gov.in/ecourtindia_v6/
| Want to comment on this post? Go to bottom of this page. |
|---|
Contents
How To Check eCourts Case Status?
You can check case status under ecourts services. There are various options used to check the status of case. They are Party Name, Case Number, Filling Number,Advocate Name, FIR Number, Act type & Case Type.
Related / Similar Service : Speed Post Status Tracking
Go to the link of ecourts services to check the status. Then click on Case status tab.
Step 1 : Select State
Step 2 : Select District
Step 3 : Select Court Complex

Search by Party Name :
Step 1 : Enter Petitioner / Respondent
Party Name maybe the name of the Petitioner, Plaintiff, Complainant, Respondent, Defendant, Appellant, Accused or Extra Party.
Step 2 : Enter Registration Year
Step 3 : Click on either the Pending or Disposed option button, according to the status of the Case.
If you don’t know the exact status of the Case, then click on the Both option button.
Step 4 : Enter Captcha
Step 5 : Click Go Button

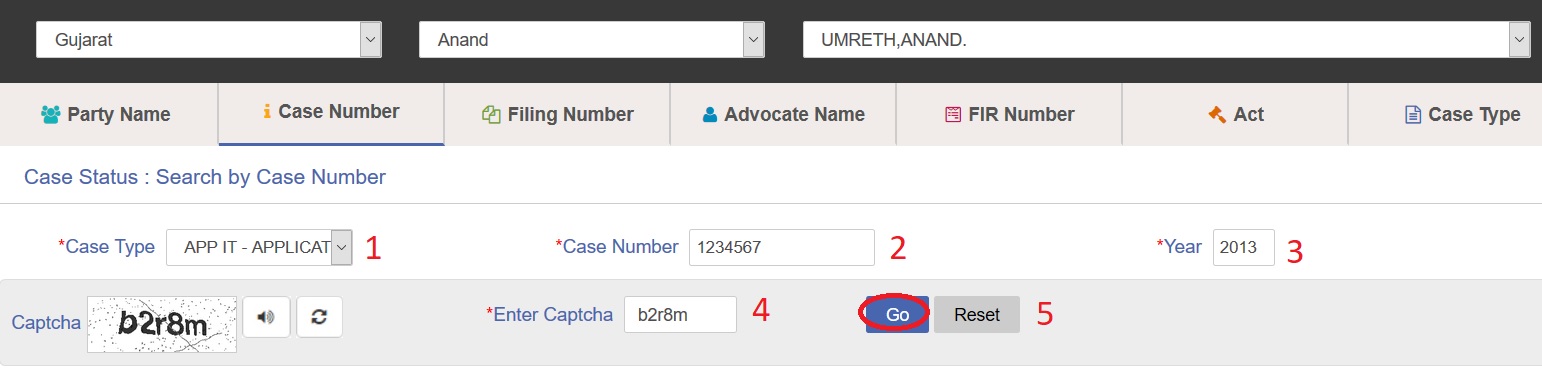
Search By Case Type :
Step 1 : Select Case Type from the select box.
Step 2 : In the Case Number box, enter the Case Registration Number.
Step 3 : Enter Year
Step 4 : Enter Captcha
Step 5 : Click on the Go button, to get the Case satisfying the given Case Number condition.
Click on the adjacent View button, to see the Case History of the respective Case.
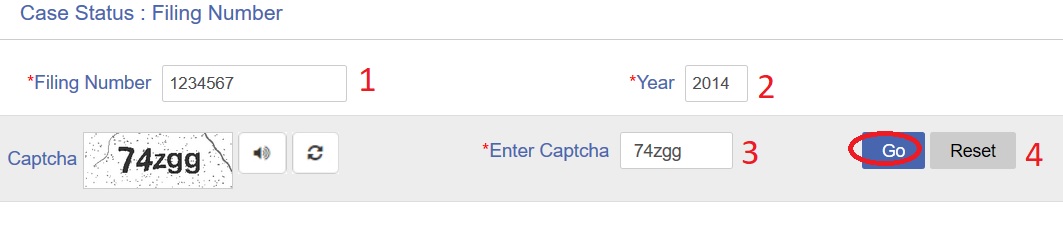
Search By Filing Number :
Step 1 : Enter Filing Number
Step 2 : Enter Year
Step 3 : Enter Captcha
Step 4 : Click Go Button
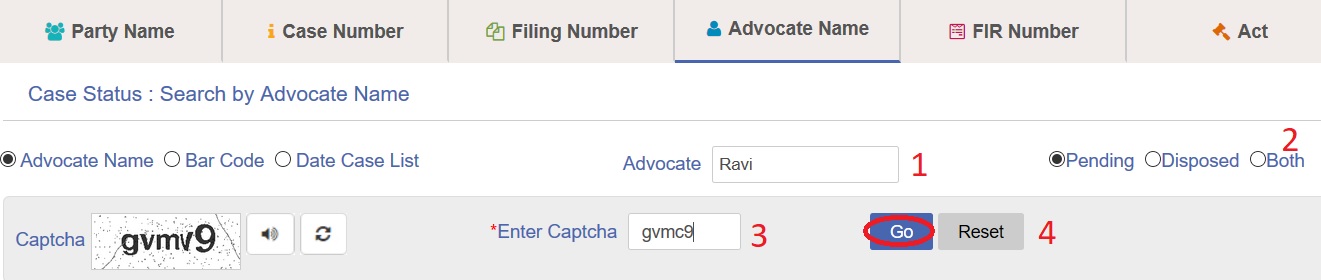
Search by Advocate Name :
The Cases can be searched by either clicking on the Advocate Name, Bar Registration Number or Advocate’s Cause List (to view the date wise cause list of Advocate) option buttons.
Advocate Name Option :
Step 1 : Enter Advocate Name
Step 2 : Select the level of case
Step 3 : Enter Captcha
Step 4 : Click Go Button
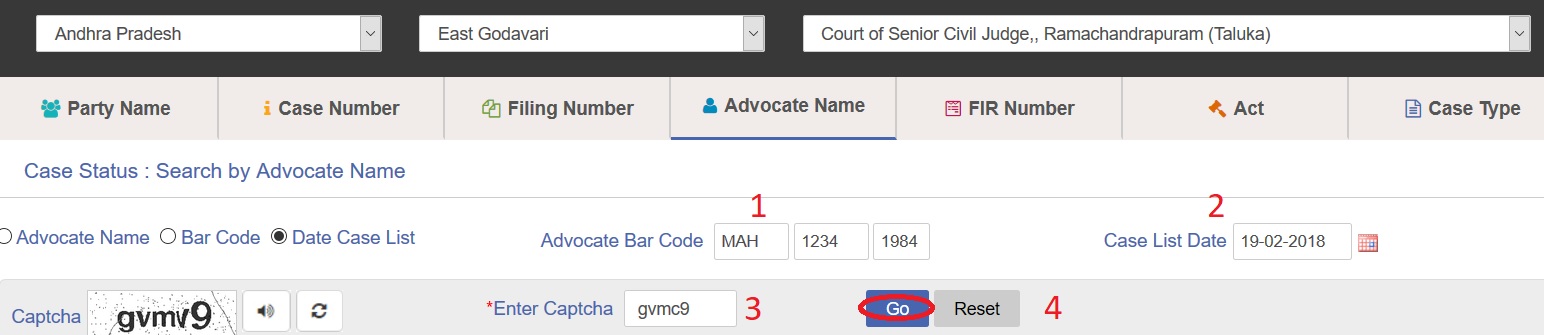
BarCode Option :
Step 1 : Enter Advocate Bar Code in the format of statecode, barcode & year
For e.g. MAH/XXXX/1982
Step 2 : Select the level of case
Step 3 : Enter Captcha
Step 4 : Click Go Button
In case of Advocate’s Cause List option, Click on Go button, to get the Advocate’s Cause List on the selected date.

Date Cause List Option :
Step 1 : Enter Advocate Bar Code in the format of statecode, barcode & year
For e.g. MAH/XXXX/1982
Step 2 : Select the level of case
Step 3 : Enter Captcha
Step 4 : Click Go Button
Search By FIR Number :
Step 1 : Select Police Station
Step 2 : Enter FIR Number
Step 3 : Enter FIR Year
Step 4 : Select the level of case
Step 5 : Enter Captcha
Step 6 : Click Go Button

Search by Act Type :
Step 1 : Enter a few letters of the Act Description in the Search Act box and press the Search button.
Step 2 : Select the required Act Type from the select box.
Step 3 : Enter in Under Section Box
Step 4 : Select the level of case
Step 5 : Enter Captcha
Step 6 : Click Go Button

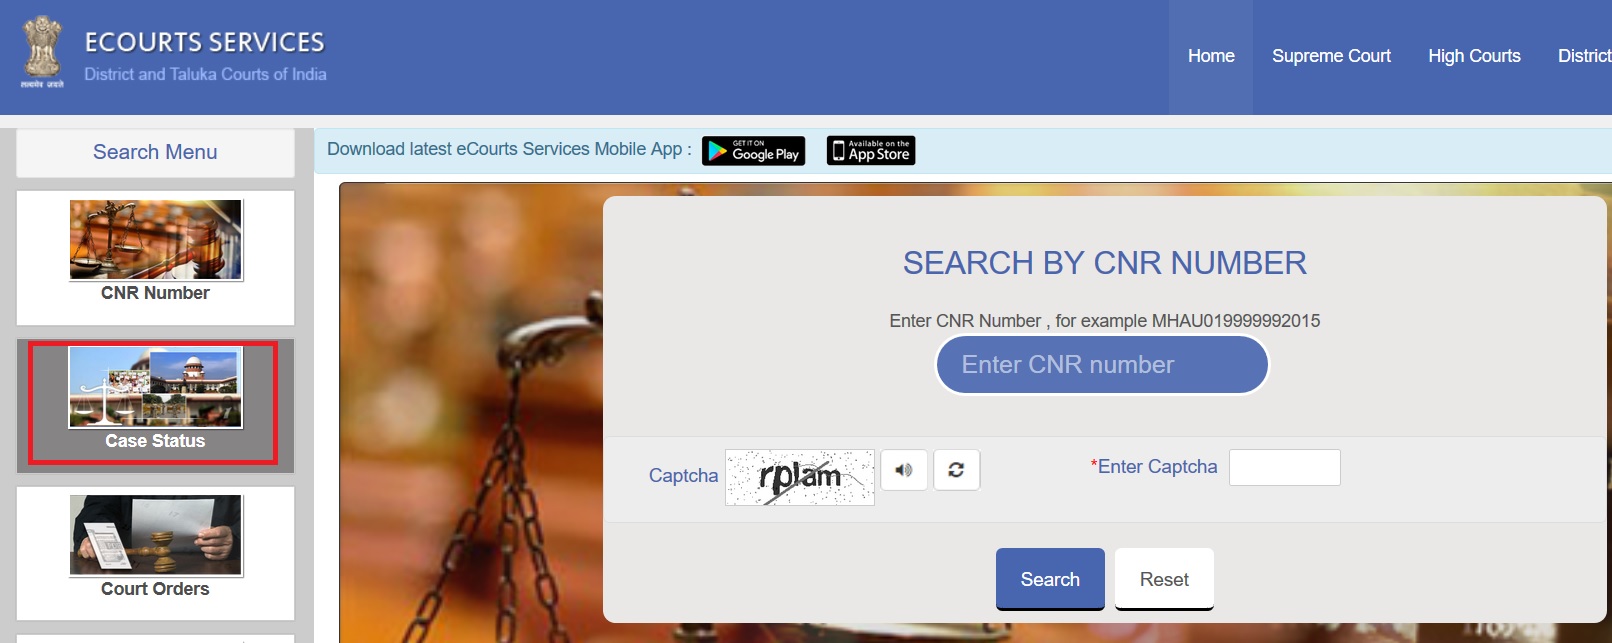
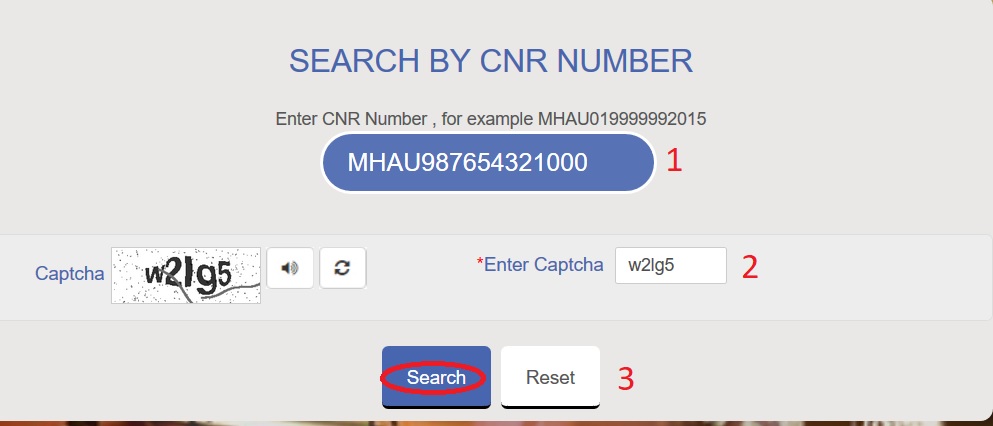
How To Search By CNR Number?
Step 1 : Enter CNR Number
Step 2 : Enter Captcha
Step 3 : Click Search Button
Case Filing for Civil cases
After you log in, the system will display the Home Page. The Show Menu tab will display the Navigation pane. This tab is located on the left hand side of the screen. Select Case & Caveat Filling to add cases. In this option you can add a Case and Caveat Filing for the selected Case type.
For Case Filing follow the steps given below:
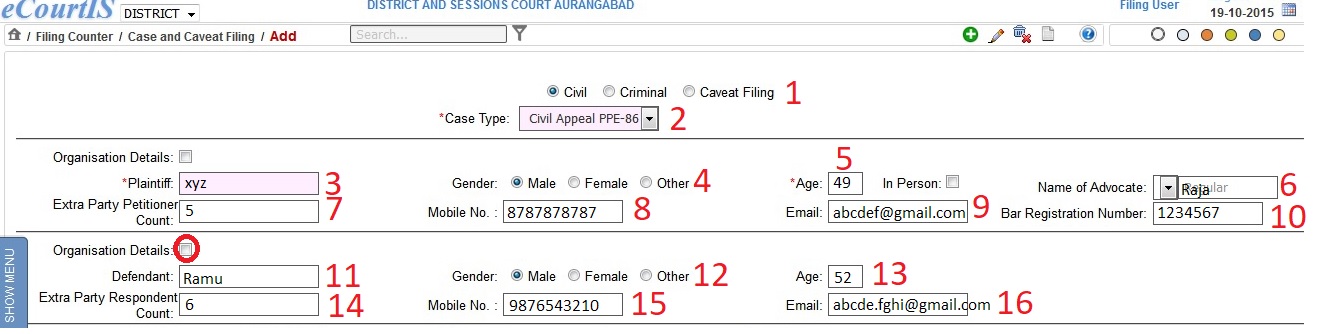
Step 1 : By default, Civil will be displayed as the selected option and so Civil case types will be displayed as a dropdown list in the Case Type select box.
For Criminal cases, select the Criminal radio button. The system will load the Criminal cases in the Case Type select box according to the selection.
The Case and Caveat filing process includes adding details of :
** Plaintiff, Defendant, and Other details for Civil case types.
** Complainant Details, Accused Details, and Other Details for Criminal case types
** Caveator and Caveatee details for Caveat filing
** Adding the details in bilingual languages also
Plaintiff Details :
Step 2 : Select the Case type from the Case Type select box.
Step 3 : Enter name of the Plaintiff in the Plaintiff field. (in bilingual language also).
Step 4 : Choose the Gender of the Plaintiff by selecting the respective radio buttons.
Step 5 : Enter Age of the Plaintiff in the Age field.
Step 6 : Enter advocate’s name in the Name of the Advocate field. (in bilingual language also)
Step 7 : Enter extra party respondent count in the Extra Party Petitioner Count field. (in bilingual language also)
Step 8 : Enter mobile number in the Mobile Number field.
Step 9 : Enter email address in the Email field.
Step 10 : Enter Bar Registration Number of the Advocate in the Bar Registration Number field.
If the Plaintiff or the Complainant is an Organization, then follow the steps given below:
Select the check box for Organization Details.
i) When you select the Organization Details check box, the system will display the Organization Name select box.
ii) Select the Organization Name from the select box. The system will display the name of the Plaintiff in the Plaintiff field. Incase of Criminal case type, the name of the complainant will be displayed in the Complainant field.
Step 11 : Enter name of the Defendant in the Defendant field. (enter in bilingual language also).
Step 12 : Choose the Gender of the Plaintiff by selecting the respective radio buttons.
Step 13 : Enter age of the Plaintiff in the Age field.
Step 14 : Enter extra party respondent count in the Extra Party Respondent Count field. (enter in bilingual language also)
Step 15 : Enter mobile number in the Mobile Number field.
Step 16 : Enter email address in the Email field.
Other Details :
Step 17 : Enter the suit valuation value in the Suit Valuation field.
Step 18 : Click the Calculate button calculate the Amount to be levied, based on the Jurisdiction value.
Step 19 : Date and Time of Filing will be displayed automatically. If you want to change the date of filing then select the Change Filing Date check box.
When you select the Change Filing Date check box, the system will display the calendar control (to change the date) and Reason for Change Filing Date field.
Change the Date of Filing using calendar control and enter the reason for changing the date in the Reason for Changing Filing Date field.
Step 20 : Select the Prayer from the Prayer select box and click button. The relief will be displayed in the Relief Claimed text box.
Step 21 : Enter the cause of action in the Cause of Action field.
Step 22 : Select the date for the cause of action from the Date of Cause of Action calendar control.
Step 23 : Select the acts from the Act1 select box and enter the Act section in the Act Section1 field.
Step 24 : To add more Acts, click More Acts button.

When you click More Acts button, the system will display the Act2 select box and the Act Section2 field. Similarly you can add more Acts for the selected case type. To remove any of the added Acts and Act Section, click Remove Acts button

To hide the Party Name, select the Hide Party Name check box. Click Submit to save the information into the system. The system will display the message, “Addition Successful”, the Filing Number which includes Case Type/Filing Number/ and Year of Filing , CNR number, and Print Acknowledgement link.
All the mandatory fields are marked with an asterix (*). Please fill all mandatory fields. 38. In case the mandatory fields are left blank, the system will display the message, “Compulsory Field”.
Reports
This feature provides facility to view the list of cases filed on a particular date. In the navigation pane, click filling check list sub menu.
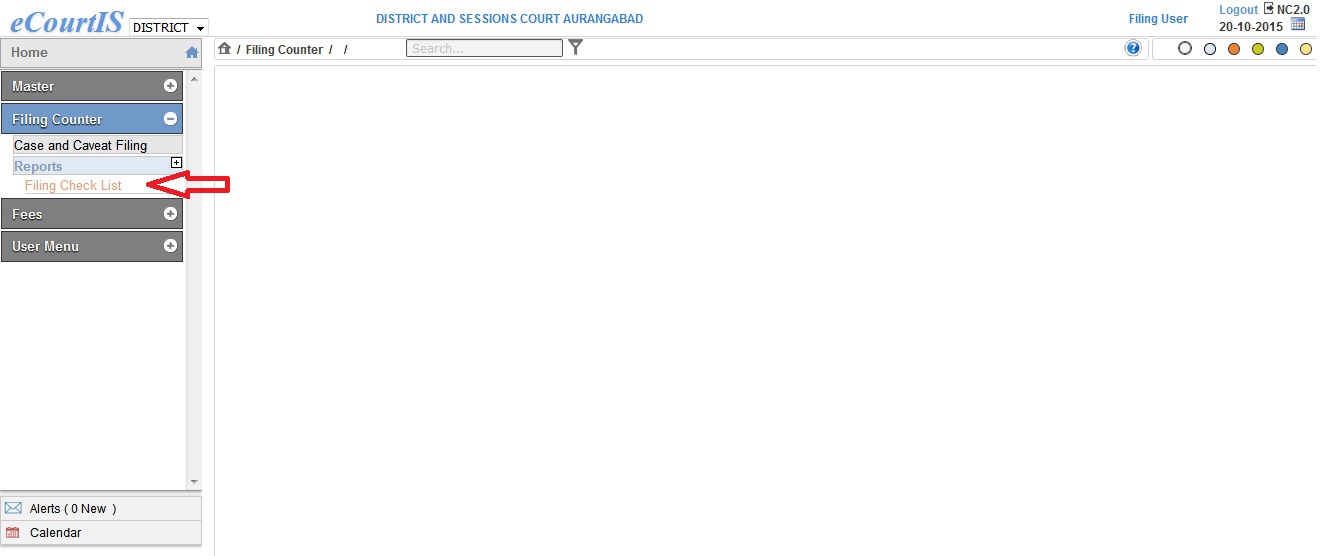
When you click the Filing Check List sub menu, the system will display the “Filing Check List (Kaccha Register) of Date” screen with Civil as the selected option. The Today’s Date field will display the current date (today’s date).

Procedure:
1. By default the system displays Civil as the selected option. The Civil option will display the Filing Check List of a particular date for Civil cases. For Criminal cases, select the Criminal radio button.
2. Also, current date is displayed in Today’s Date field. The system will display the Filing Check List for the current date (Today’s Date).
3. Incase you want to view the Filing Check List for another date; select the date from the calendar control.
4. After you select the date, click Go. The system will load the View link.

Click the View link. The system will display the Filing Check List for the selected date.
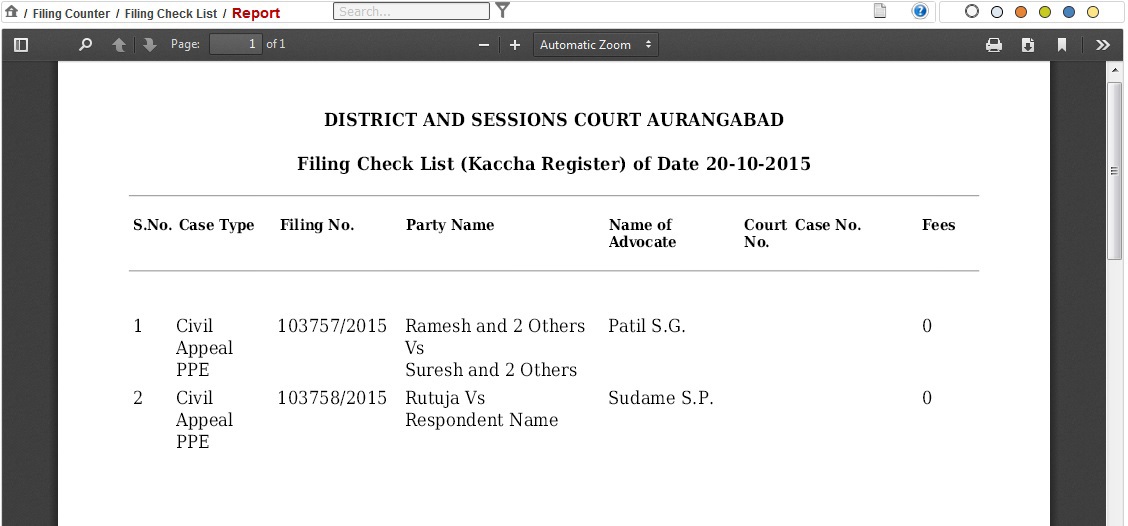
The report displays the details given below :
** Case Type
** Filing No.
** Party Name
** Name of Advocate
** Court No.
** Case No.
** Fees
Receipt Fees
This facility describes about adding the Fees that are submitted with the case.
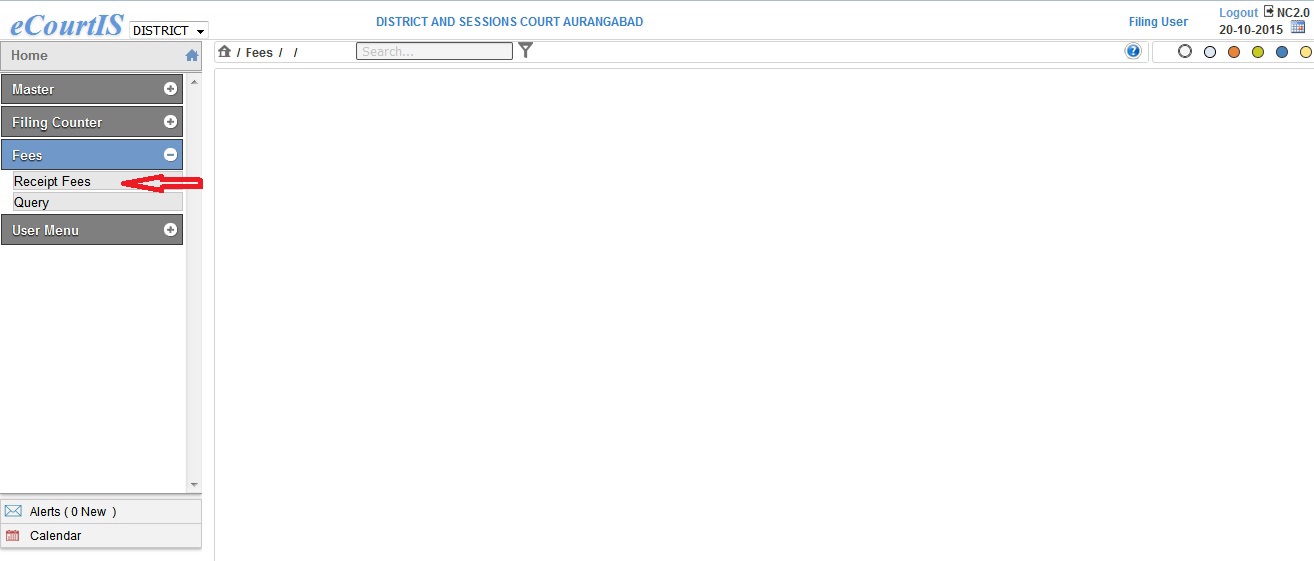
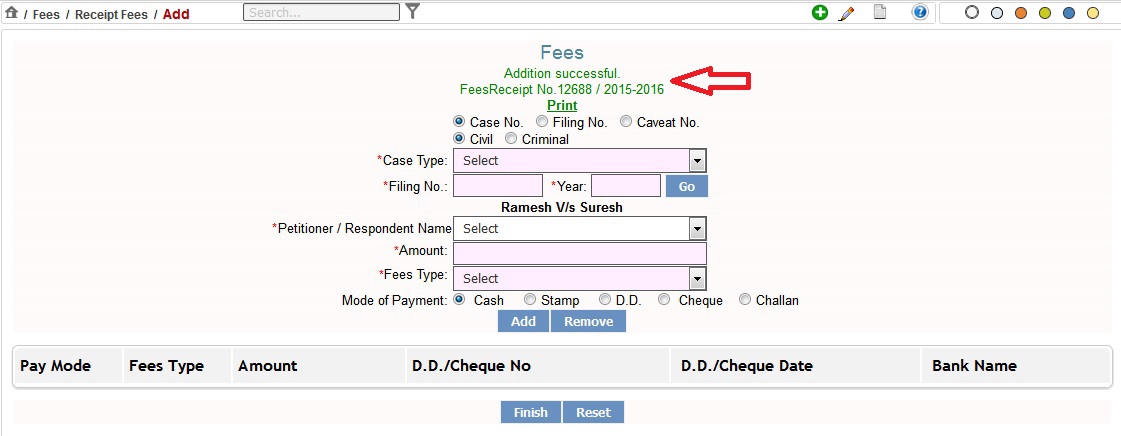
When you click the Receipt Fees sub menu, the system will display the “Receipt Fees” screen with Case Number and Civil as the selected option. Also by default the system displays Civil as the selected option. In this case, the civil cases will be displayed in the Case Type field. For Criminal cases; select the Criminal radio button.
Fields to be Entered :
Step 1 : Select the type you want to search for
Step 2 : Select the case for which you want to add the Fees from the Case Type select box.
Step 3 : Enter the case number of the selected case in the Case No. field.
Step 4 : Enter the year of Filing in the Year field. Click Go. The system will display the Petitioner/Respondent Name
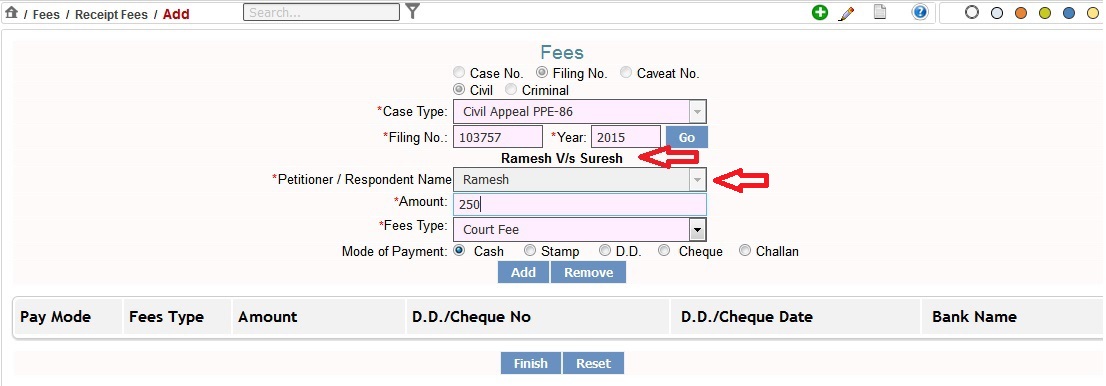
In case of wrong entries the system will display the message, “This Case Does Not Exists or Does Not Belong To This Court”. Select the Petitioner or Respondent from the Petitioner/Respondent Name select box.
Step 5 : Enter the amount of Fees the Petitioner/Respondent has to pay in the Amount field.
Step 6 : Select the fees type from the Fees Type select box.
Step 7 : Choose the mode of payment by selecting the radio buttons for Cash, Stamp, D.D (Demand Draft), Cheque, or Challan and
Step 8 : Click Add Button
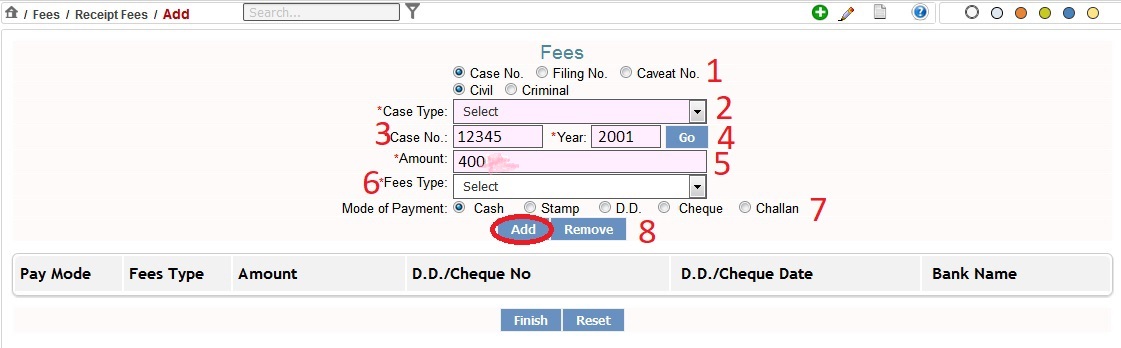
When you click Add, the details of the fees for the selected Case Type will be displayed

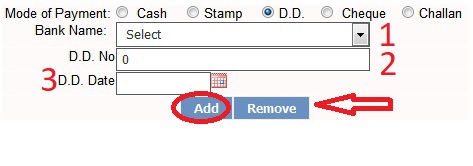
For Stamp as the mode of Payment, the fields are same as Cash Mode of Payment. Incase of D.D (Demand Draft) option the system will display Bank Name, D.D. No., and D.D Date fields.
Step 1 : Select the name of the Bank from the Bank Name select box.
Step 2 : Enter the number of the demand draft in the D.D No. field.
Incase of Cheque option the system will display the Bank Name, Cheque No., and Cheque Date fields. Incase of Challan option the system will display the Bank Name, Challan No., and Challan Date.
Step 3 : Enter the date on the demand draft in the D.D. Date field.
After you have selected the Mode of Payment and added the details as per the Mode of Payment, click Add button. The added fees details will be added and displayed in the form

Click Remove to remove the added Fees for the selected Case Type. Click Reset to modify the entered details. Click Finish to save the information into the system. The system will display the message, “Addition Successful” and Fees Receipt No. XXXXXX/2015‐2016” and the Print link.
Download Filling User Manual : www.indianin.org/wp-content/uploads/Govt/Filing.pdf
FAQs On CNR Number
Frequently Asked Question (FAQs) On CNR Number
What is CNR Number?
CNR Number will be in the format of MHAU019999992015.
I dont know my CNR number. How can I make to search the case?
If you don’t know the CNR number of the Case then it can be searched by other options like Case Registration Number, Party Name, Advocate Name etc. For this, click on the Case Status image, which is shown on the left hand side menu.